mysql源码编译使用clion调试

国庆假期闲来无事,编译一个mysql玩玩。参考:
Mac Clion MySQL 8.0 源码调试环境搭建

因为所接触的系统大多没升级到mysql8.0,所以使用的mysql源码版本是 mysql-5.7.23.下载链接:

1
https://cdn.mysql.com//Downloads/MySQL-5.7/mysql-boost-5.7.23.tar.gz

第一步(进入mysql源码目录)

1
2
3
4
5
6
cmake -DCMAKE_INSTALL_PREFIX=/Volumes/longmao/openProject/sc/mysql_data/mysql-5.7.23-rc 
-DMYSQL_DATADIR=/Volumes/longmao/openProject/sc/mysql_data/mysql-5.7.23-rc/data
-DSYSCONFDIR=/Volumes/longmao/openProject/sc/mysql_data/mysql-5.7.23-rc
-DMYSQL_UNIX_ADDR=/Volumes/longmao/openProject/sc/mysql_data/mysql-5.7.23-rc/data/mysql.sock
-DWITH_DEBUG=1 -DDOWNLOAD_BOOST=1
-DWITH_BOOST=/Volumes/longmao/openProject/sc/boost_1_59_0

第二步

1
make -j 4

第三步

1
make install -j 4

第四步-初始化数据库

1
2
3
cd /Volumes/longmao/openProject/sc/mysql_data/mysql-5.7.23-rc/bin

./mysqld --basedir=/Volumes/longmao/openProject/sc/mysql_data/mysql-5.7.23-rc --datadir=/Volumes/longmao/openProject/sc/mysql_data/mysql-5.7.23-rc/data --initialize-insecure --user=longmao

clion启动mysql服务

连接mysql

1
mysql -h127.0.0.1 -P3306 -uroot

密码为空

即可在clion中开启断点调试,了解mysql运行机理

从0到1实现一个支付系统

最近离职在家,闲来无事,研究如何实现一个支付系统

服务划分

  • dubbo服务对应端口
工程 端口 描述
pay-service-account 20801 账户服务
pay-service-bank 20802 银行管理服务
pay-service-banklink 20892 银行后置服务
pay-service-boss 20804 运营服务
pay-service-fee 20807 商户计费服务
pay-service-limit 20809 交易限制服务
pay-service-notify 20822 通知服务
pay-service-payrule 20811 支付规则服务
pay-service-remit 20813 打款服务
pay-service-report 20815 报表服务
pay-service-settlement 20816 结算服务
pay-service-trade 20817 交易服务
pay-service-user 20818 用户服务
  • web服务对应端口
工程 端口 描述
pay-web-boss 8083 运营管理系统
pay-web-gateway 8084 支付网关
pay-web-notify-receive 8086 通知消息接收
pay-web-portal 8085 门户系统
pay-web-trade 8087 交易系统

技术架构

管理

  • maven依赖和项目管理
  • git版本控制
  • Jenkins持续构建

后端

  • IoC容器 Spring
  • web框架 SpringMvc
  • orm框架 Mybatis
  • rpc框架 Dubbo
  • 任务调度框架 quartz
  • 缓存 redis
  • 数据源 druid
  • 日志 slf4j+log4j2
  • Json jackson
  • kaptcha 验证码
  • jsp 模板视图

前端

  • jquery js框架
  • easyui 界面框架
  • zTree 树框架

分布式事务:使用tcc-transaction框架

运营管理后台

gitlab源码管理

jenkins服务自动化部署

项目结构

包括dubbo服务启动脚本

待完善点(或者说不懂做)

  • 风控系统:只要老板不想把底裤都赔掉,那就必须上风控。可对互联网公司来说,风控是一个谜一般的话题,无论是对风控专家还是IT工程师而言。机器学习,深度学习,规则推理,随机森林….这些只想说还不知道怎么玩~~
  • 对账系统:每一笔交易,都要做到各参与者的记录能够吻合,没有偏差。对账系统的工作,是发现有差异的记录,即轧帐;然后通过人工或者自动的方式,解决这些差异,即平帐。

龙猫云消息推送系统

系统架构

项目结构

  • mpush:开源的实时消息推送系统,基于该项目改造了其中消息推送流程,使用pulsar订阅推送的消息,作为一个broker
  • push-admin:使用spring-boot搭建的消息推送管理后台
  • alloc:是针对client提供的一个轻量级的负载均衡服务,每次客户端在链接broker之前都要调用下该服务
  • mpush-android:android客户端

使用的开源项目

  • netty
  • mpush
  • pulsar:存储与计算分离的新一代消息中间件
  • herdb:HerdDB 一个JVM-embeddable的分布式数据库,内嵌在broker里使用

功能演示

  • 消息推送管理后台

  • Android客户端

未来计划

  • 完成应用管理功能:用户可以创建多个应用,给应用分配appKey
  • 数据统计:接入新设备统计、消息推送记录、消息到达率统计、消息点击率统计
  • 新建龙猫云推送管理平台:应用计费统计等(计划是一个推送云平台产品,功能待定~~)
  • 推送sdk:建设统一sdk,拿分配到的appKey接入龙猫云推送平台

Apache Bookkeeper BookieService服务启动

Apache BookKeeper 是一个可以方便扩展,高可用,低延迟的存储系统。BookKeeper 专门为 append-only 的工作模式提供了优化,在以下的应用场景中非常适用:

  • WAL (Write-Ahead-Logging), 例如 HDFS 的 NameNode

  • 消息存储系统,例如 Apache Pulsar

  • Offset/Cursor 存储系统,例如在 Apache Pulsar 中用来存储消息消费位置

  • Object/Blob Store 对象存储系统,例如存储状态机的 snapshots

avatar

初始化BookieServer

1
2
3
4
5
6
7
8
9
10
11
12
13
14
15
16
17
18
19
20
21
22
23
24
25
26
27
28
29
30
31
32
33
34
35
36
37
38
39
40
41
42
43
44
45
46
	public BookieService(BookieConfiguration conf,
StatsLogger statsLogger)

throws Exception {

super(NAME, conf, statsLogger);
this.server = new BookieServer(conf.getServerConf(), statsLogger);
}


//BookieServer.java

public BookieServer(ServerConfiguration conf, StatsLogger statsLogger)
throws IOException, KeeperException, InterruptedException,
BookieException, UnavailableException, CompatibilityException, SecurityException {

this.conf = conf;
//校验用户权限
validateUser(conf);
String configAsString;
try {
configAsString = conf.asJson();
LOG.info(configAsString);
} catch (ParseJsonException pe) {
LOG.error("Got ParseJsonException while converting Config to JSONString", pe);
}

//构造内存分配器
ByteBufAllocator allocator = getAllocator(conf);
this.statsLogger = statsLogger;
//构造NettyServer
this.nettyServer = new BookieNettyServer(this.conf, null, allocator);
try {
//构造Bookie实例
this.bookie = newBookie(conf, allocator);
} catch (IOException | KeeperException | InterruptedException | BookieException e) {
// interrupted on constructing a bookie
this.nettyServer.shutdown();
throw e;
}
final SecurityHandlerFactory shFactory;

shFactory = SecurityProviderFactoryFactory
.getSecurityProviderFactory(conf.getTLSProviderFactoryClass());
//指定NettyServer的RequestProcessor
this.requestProcessor = new BookieRequestProcessor(conf, bookie,
statsLogger.scope(SERVER_SCOPE), shFactory, bookie.getAllocator());
this.nettyServer.setRequestProcessor(this.requestProcessor);
}

BookieServer共有4大组件要初始化

  • StatsLogger:
  • Bookie:bookie实例
  • BookieNettyServer:其实就是一个netty服务端
  • DeathWatcher:一个线程,观察bookie和netty是否还存活

初始化Bookie

public Bookie(ServerConfiguration conf, StatsLogger statsLogger, ByteBufAllocator allocator)
        throws IOException, InterruptedException, BookieException {
    super("Bookie-" + conf.getBookiePort());
    this.statsLogger = statsLogger;
    this.conf = conf;
    // 从配置文件中获取journal 目录 list,然后在在每个目录下创建一个current目录
    this.journalDirectories = Lists.newArrayList();
    for (File journalDirectory : conf.getJournalDirs()) {
        this.journalDirectories.add(getCurrentDirectory(journalDirectory));
    }
    /**
     *  初始化DiskChecker,有两个参数 diskUsageThreshold 和 diskUsageWarnThreshold
     *  diskUsageThreshold表示磁盘的最大使用率,默认是0.95,目录列表中的所有目录都超过限制之后
     *  如果bookie配置可以以readonly模式运行,就会转化为readonly状态,否则会停止;
     *  diskUsageWarnThreshold 表示磁盘使用的告警阈值,默认是0.90,超过这个值会抛出
     *  DiskWarnThresholdException,并且会触发gc,当使用率低于这个值时,目录重新变为可写状态
     **/
    DiskChecker diskChecker = createDiskChecker(conf);
    //为ledger和index创建LedgerDirsManager,用来管理ledger和index的目录列表
    this.ledgerDirsManager = createLedgerDirsManager(conf, diskChecker, statsLogger.scope(LD_LEDGER_SCOPE));
    this.indexDirsManager = createIndexDirsManager(conf, diskChecker, statsLogger.scope(LD_INDEX_SCOPE),
                                                   this.ledgerDirsManager);
    this.allocator = allocator;

    // instantiate zookeeper client to initialize ledger manager
    //初始化zk 客户端
    this.metadataDriver = instantiateMetadataDriver(conf);
    checkEnvironment(this.metadataDriver);
    try {
        if (this.metadataDriver != null) {
            // current the registration manager is zookeeper only
            // 初始化ledgerManagerFactory,用于生成ledgerManager
            ledgerManagerFactory = metadataDriver.getLedgerManagerFactory();
            LOG.info("instantiate ledger manager {}", ledgerManagerFactory.getClass().getName());
            // ledgerManager负责和zk等元数据存储交互,用来管理ledger的元数据信息
            ledgerManager = ledgerManagerFactory.newLedgerManager();
        } else {
            ledgerManagerFactory = null;
            ledgerManager = null;
        }
    } catch (MetadataException e) {
        throw new MetadataStoreException("Failed to initialize ledger manager", e);
    }
    // 初始化状态管理器
    stateManager = initializeStateManager();
    // register shutdown handler using trigger mode
    stateManager.setShutdownHandler(exitCode -> triggerBookieShutdown(exitCode));
    // Initialise dirsMonitor. This would look through all the
    // configured directories. When disk errors or all the ledger
    // directories are full, would throws exception and fail bookie startup.

    //LedgerDirsMonitor, 监控所有配置的目录,如果发现磁盘错误或者所有的leger 目录都满,就抛出异常,
    //bookie启动失败
    List<LedgerDirsManager> dirsManagers = new ArrayList<>();
    dirsManagers.add(ledgerDirsManager);
    if (indexDirsManager != ledgerDirsManager) {
        dirsManagers.add(indexDirsManager);
    }
    this.dirsMonitor = new LedgerDirsMonitor(conf, diskChecker, dirsManagers);
    try {
        this.dirsMonitor.init();
    } catch (NoWritableLedgerDirException nle) {
        // start in read-only mode if no writable dirs and read-only allowed
        if (!conf.isReadOnlyModeEnabled()) {
            throw nle;
        } else {
            this.stateManager.transitionToReadOnlyMode();
        }
    }

    // instantiate the journals 初始化journal
    journals = Lists.newArrayList();
    for (int i = 0; i < journalDirectories.size(); i++) {
        journals.add(new Journal(i, journalDirectories.get(i),
                conf, ledgerDirsManager, statsLogger.scope(JOURNAL_SCOPE), allocator));
    }

    this.entryLogPerLedgerEnabled = conf.isEntryLogPerLedgerEnabled();
    CheckpointSource checkpointSource = new CheckpointSourceList(journals);

    //初始化ledgerStore,默认是一个 SortedLedgerStorage
    ledgerStorage = buildLedgerStorage(conf);

    boolean isDbLedgerStorage = ledgerStorage instanceof DbLedgerStorage;

    /*
     * with this change https://github.com/apache/bookkeeper/pull/677,
     * LedgerStorage drives the checkpoint logic.
     *
     * <p>There are two exceptions:
     *
     * 1) with multiple entry logs, checkpoint logic based on a entry log is
     *    not possible, hence it needs to be timebased recurring thing and
     *    it is driven by SyncThread. SyncThread.start does that and it is
     *    started in Bookie.start method.
     *
     * 2) DbLedgerStorage
     */

    /**
     * 一般都是由 LedgerStorage来驱动checkpoint 逻辑,但是有两个例外:
     * 1. 有多个entry logs,checkpoint逻辑不能依赖于一个entry log,应该是一个基于时间的循环,有SyncThread驱动
     * 2. DbLegerStorage
     */
    if (entryLogPerLedgerEnabled || isDbLedgerStorage) {
        syncThread = new SyncThread(conf, getLedgerDirsListener(), ledgerStorage, checkpointSource) {
            @Override
            public void startCheckpoint(Checkpoint checkpoint) {
                /*
                 * in the case of entryLogPerLedgerEnabled, LedgerStorage
                 * dont drive checkpoint logic, but instead it is done
                 * periodically by SyncThread. So startCheckpoint which
                 * will be called by LedgerStorage will be no-op.
                 */
            }

            @Override
            public void start() {
                executor.scheduleAtFixedRate(() -> {
                    doCheckpoint(checkpointSource.newCheckpoint());
                }, conf.getFlushInterval(), conf.getFlushInterval(), TimeUnit.MILLISECONDS);
            }
        };
    } else {
        syncThread = new SyncThread(conf, getLedgerDirsListener(), ledgerStorage, checkpointSource);
    }

    //初始化LedgerStorage
    ledgerStorage.initialize(
        conf,
        ledgerManager,
        ledgerDirsManager,
        indexDirsManager,
        stateManager,
        checkpointSource,
        syncThread,
        statsLogger,
        allocator);


    /**
     * HandleFactoryImpl 用来获取 handle,这里的 handle 是 LedgerDescriptor,是 ledger 的实现
     * 主要负责向 ledger addEntry 和或者从ledger readeEntry
     */
    handles = new HandleFactoryImpl(ledgerStorage);

    // Expose Stats
    this.bookieStats = new BookieStats(statsLogger);
}

参考: https://www.jianshu.com/p/776028224419

apache bookkeeper bookie 启动流程源码分析

Apache BookKeeper 是一个可以方便扩展,高可用,低延迟的存储系统。BookKeeper 专门为 append-only 的工作模式提供了优化,在以下的应用场景中非常适用:

  • WAL (Write-Ahead-Logging), 例如 HDFS 的 NameNode

  • 消息存储系统,例如 Apache Pulsar

  • Offset/Cursor 存储系统,例如在 Apache Pulsar 中用来存储消息消费位置

  • Object/Blob Store 对象存储系统,例如存储状态机的 snapshots

1
2
3
4
5
6
7
8
9
10
11
12
13
14
15
16
17
18
19
20
21
22
23
24
25
26
27
28
29
30
31
32
33
34
35
36
37
38
public static void main(String[] args) {
int retCode = doMain(args);
Runtime.getRuntime().exit(retCode);
}

static int doMain(String[] args) {

ServerConfiguration conf;

// 0. parse command line
try {
conf = parseCommandLine(args);
} catch (IllegalArgumentException iae) {
return ExitCode.INVALID_CONF;
}

// 1. building the component stack:
LifecycleComponent server;
try {
server = buildBookieServer(new BookieConfiguration(conf));
} catch (Exception e) {
log.error("Failed to build bookie server", e);
return ExitCode.SERVER_EXCEPTION;
}

// 2. start the server
try {
ComponentStarter.startComponent(server).get();
} catch (InterruptedException ie) {
Thread.currentThread().interrupt();
// the server is interrupted
log.info("Bookie server is interrupted. Exiting ...");
} catch (ExecutionException ee) {
log.error("Error in bookie shutdown", ee.getCause());
return ExitCode.SERVER_EXCEPTION;
}
return ExitCode.OK;
}

注释很清晰,可以看到启动bookie服务主要做这三步:

  • 解析system property
  • 构建bookie服务所需的组件
  • 启动各个组件

解析system property

1
2
BasicParser parser = new BasicParser();
CommandLine cmdLine = parser.parse(BK_OPTS, args);

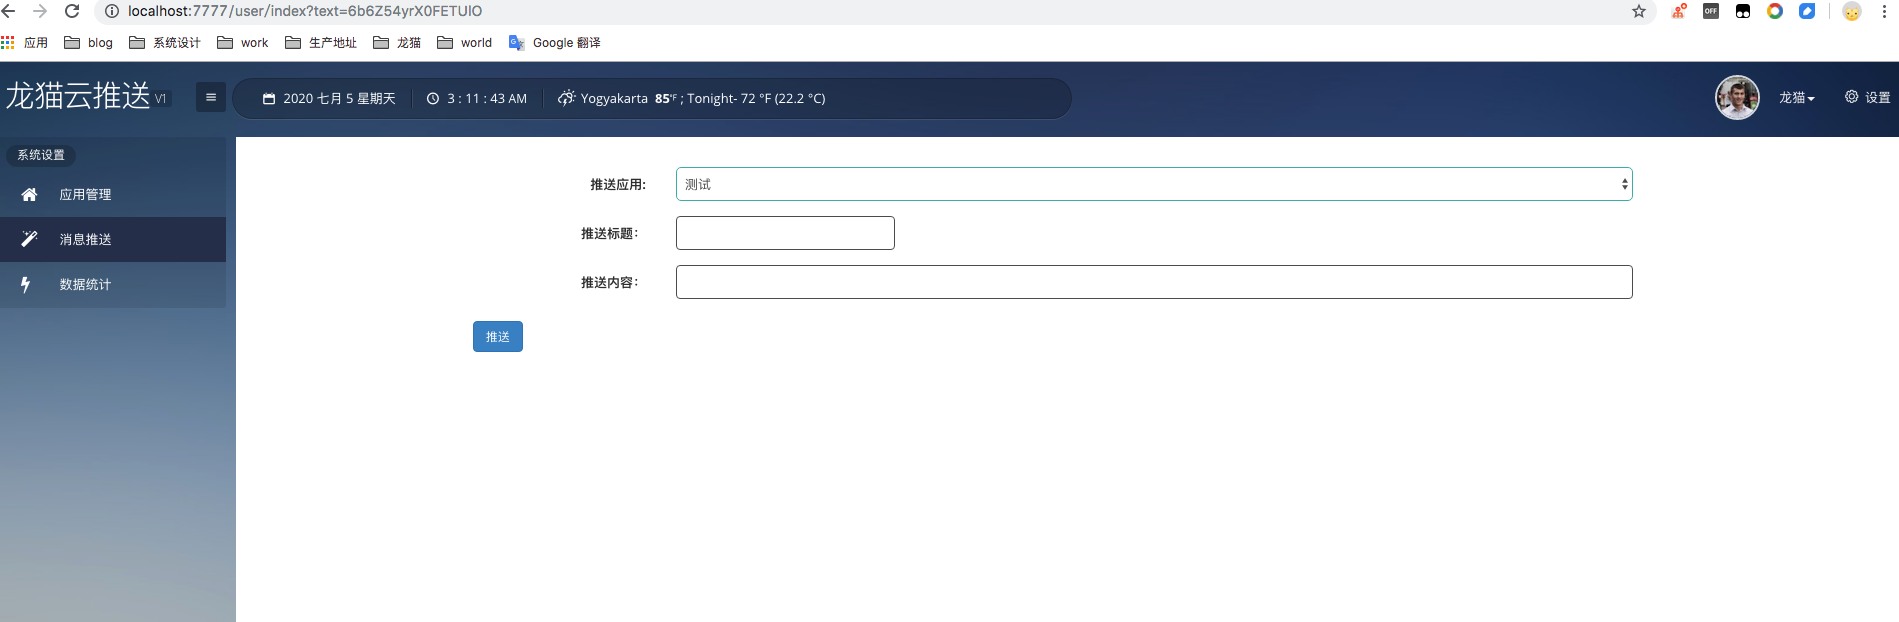
system property是java应用程序自身指定的变量,通常我们可以在启动应用的时候指定的,格式是:-DsystemPropertyKey=systemPropertyValue(楼主在本地启动bookie服务在idea设置的Program rguments:–conf /Volumes/longmao/bookkeeper-confg/b1.conf),解析system property使用了apache开源工具commons-cli(自己写应用或框架可以借鉴下其写法,用来加载应用自定义的配置)。

1
2
3
4
5
6
7
8
9
10
11
12
13
14
15
16
17
18
static {
BK_OPTS.addOption("c", "conf", true, "Configuration for Bookie Server");
BK_OPTS.addOption("withAutoRecovery", false,
"Start Autorecovery service Bookie server");
BK_OPTS.addOption("r", "readOnly", false,
"Force Start a ReadOnly Bookie server");
BK_OPTS.addOption("z", "zkserver", true, "Zookeeper Server");
BK_OPTS.addOption("m", "zkledgerpath", true, "Zookeeper ledgers root path");
BK_OPTS.addOption("p", "bookieport", true, "bookie port exported");
BK_OPTS.addOption("j", "journal", true, "bookie journal directory");
Option indexDirs = new Option ("i", "indexdirs", true, "bookie index directories");
indexDirs.setArgs(10);
BK_OPTS.addOption(indexDirs);
Option ledgerDirs = new Option ("l", "ledgerdirs", true, "bookie ledgers directories");
ledgerDirs.setArgs(10);
BK_OPTS.addOption(ledgerDirs);
BK_OPTS.addOption("h", "help", false, "Print help message");
}

含义:

  • -c/–conf:使用的配置文件
  • -r/–readOnly:是否只读

构建bookie服务所需的组件

1
2
3
4
5
6
7
8
9
10
11
12
13
14
15
16
17
18
19
20
21
22
23
24
25
26
27
28
29
30
31
32
33
34
35
36
37
38
39
40
41
42
43
44
45
46
47
48
49
50
51
52
53
54
55
56
57
58
59
60
61
62
63
64
65
66
67
68
69
70
71
72
public static LifecycleComponentStack buildBookieServer(BookieConfiguration conf) throws Exception {
LifecycleComponentStack.Builder serverBuilder = LifecycleComponentStack.newBuilder().withName("bookie-server");

// 1. build stats provider
StatsProviderService statsProviderService =
new StatsProviderService(conf);
StatsLogger rootStatsLogger = statsProviderService.getStatsProvider().getStatsLogger("");

serverBuilder.addComponent(statsProviderService);
log.info("Load lifecycle component : {}", StatsProviderService.class.getName());

// 2. build bookie server
BookieService bookieService =
new BookieService(conf, rootStatsLogger);

serverBuilder.addComponent(bookieService);
log.info("Load lifecycle component : {}", BookieService.class.getName());

if (conf.getServerConf().isLocalScrubEnabled()) {
serverBuilder.addComponent(
new ScrubberService(
rootStatsLogger.scope(ScrubberStats.SCOPE),
conf, bookieService.getServer().getBookie().getLedgerStorage()));
}

// 3. build auto recovery
if (conf.getServerConf().isAutoRecoveryDaemonEnabled()) {
AutoRecoveryService autoRecoveryService =
new AutoRecoveryService(conf, rootStatsLogger.scope(REPLICATION_SCOPE));

serverBuilder.addComponent(autoRecoveryService);
log.info("Load lifecycle component : {}", AutoRecoveryService.class.getName());
}

// 4. build http service
if (conf.getServerConf().isHttpServerEnabled()) {
BKHttpServiceProvider provider = new BKHttpServiceProvider.Builder()
.setBookieServer(bookieService.getServer())
.setServerConfiguration(conf.getServerConf())
.setStatsProvider(statsProviderService.getStatsProvider())
.build();
HttpService httpService =
new HttpService(provider, conf, rootStatsLogger);

serverBuilder.addComponent(httpService);
log.info("Load lifecycle component : {}", HttpService.class.getName());
}

// 5. build extra services
String[] extraComponents = conf.getServerConf().getExtraServerComponents();
if (null != extraComponents) {
try {
List<ServerLifecycleComponent> components = loadServerComponents(
extraComponents,
conf,
rootStatsLogger);
for (ServerLifecycleComponent component : components) {
serverBuilder.addComponent(component);
log.info("Load lifecycle component : {}", component.getClass().getName());
}
} catch (Exception e) {
if (conf.getServerConf().getIgnoreExtraServerComponentsStartupFailures()) {
log.info("Failed to load extra components '{}' - {}. Continuing without those components.",
StringUtils.join(extraComponents), e.getMessage());
} else {
throw e;
}
}
}

return serverBuilder.build();
}

利用第一步解析配置生成的BookieConfiguration对象构造bookie服务依赖的组件,bookie启动过程中需要启动的服务组件:

  • StatsProviderService 指标服务
  • BookieService bookie服务
  • AutoRecoveryService 自动恢复服务
  • HttpService http rest服务
  • 其它服务

利用了LifecycleComponentStack这各类保存了需要启动的组件并规定了组件生命周期内执行的方法:

1
2
3
4
5
6
7
8
9
10
11
12
13
14
@Override
public void start() {
components.forEach(component -> component.start());
}

@Override
public void stop() {
components.reverse().forEach(component -> component.stop());
}

@Override
public void close() {
components.reverse().forEach(component -> component.close());
}

有没有觉得很熟悉,tomcat源码里也有类似的设计,tomcat中的接口:org.apache.catalina.Lifecycle 定义了容器生命周期、容器状态转换及容器状态迁移事件的监听器和移除等主要接口,tomcat里的组件StandardHost等实现了这个接口,维护自身生命周期运转过程中要执行的逻辑。只能说优秀的源码套路都是差不多^_^

启动服务

遍历LifecycleComponentStack中的
ImmutableList components对象,执行各个服务组件的start方法

Bookeeper基本使用

初始化Bookeeper Client

1
2
3
4
5
6
7
8
9
10
11
12
13

private static final String ZK_ADDR = "127.0.0.1:2181";

try {
//初始化 BookKeeper Client 的方法

BookKeeper bkClient = new BookKeeper(ZK_ADDR);

} catch (Exception e) {
e.printStackTrace();
throw new RuntimeException(
"There is an exception throw while creating the BookKeeper client.");
}

创建ledger

1
2
3
4
5
6
7
8
9
10
11
12
13
14
15
16
LedgerHandle longmaoHandler = createLedgerSync(bkClient, "longmaoHandler");

System.out.println("longmaoHandler ledgerId:" + longmaoHandler.getId());

public static LedgerHandle createLedgerSync(BookKeeper bkClient, String pw) {
byte[] password = pw.getBytes();
try {
LedgerHandle handle = bkClient.createLedger(BookKeeper.DigestType.MAC, password);
return handle;
} catch (BKException e) {
e.printStackTrace();
} catch (InterruptedException e) {
e.printStackTrace();
}
return null;
}

向Ledger写入数据

1
2
3
4
5
6
7
8
9
10
11
12
13
//添加数据
long maomao = addEntry(longmaoHandler, "maomao");

public static long addEntry(LedgerHandle ledgerHandle, String msg) {
try {
return ledgerHandle.addEntry(msg.getBytes());
} catch (InterruptedException e) {
e.printStackTrace();
} catch (BKException e) {
e.printStackTrace();
}
return -1;
}

读取数据

1
2
3
4
5
6
7
8
9
10
11
12
13
14
15
16
17
18
19
20
//读取数据
Enumeration<LedgerEntry> ledgerEntryEnumeration = readEntry(longmaoHandler);

System.out.println(ledgerEntryEnumeration);
while (ledgerEntryEnumeration.hasMoreElements()) {
LedgerEntry ledgerEntry = ledgerEntryEnumeration.nextElement();
System.out.println("读取数据");
System.out.println(new String(ledgerEntry.getEntry()));
}

public static Enumeration<LedgerEntry> readEntry(LedgerHandle ledgerHandle) {
try {
return ledgerHandle.readEntries(0, ledgerHandle.getLastAddConfirmed());
} catch (InterruptedException e) {
e.printStackTrace();
} catch (BKException e) {
e.printStackTrace();
}
return null;
}

java并发基础-01

java对象内存布局

首先要明确的是java对象大小必须是8的倍数,对象头占12字节

java 对象分为三部分:对象头(12字节)、实例数据、对齐填充(保证整个对象大小是8的倍数)

openJDK有个工具包,可以打印对象的内存布局:

1
2
3
4
5
<dependency>
<groupId>org.openjdk.jol</groupId>
<artifactId>jol-core</artifactId>
<version>0.10</version>
</dependency>

打印java对象内存布局:

1
2
3
4
5
6
7
8
9
10
11
12
13
14
public class Mao {

boolean flag;

int a;
}

public class TestMao {

public static void main(String[] args) {
Mao mao = new Mao();
System.out.println(ClassLayout.parseInstance(mao).toPrintable());
}
}

结果:

1
2
3
4
5
6
7
8
9
10
learn.Mao object internals:
OFFSET SIZE TYPE DESCRIPTION VALUE
0 4 (object header) 01 00 00 00 (00000001 00000000 00000000 00000000) (1)
4 4 (object header) 00 00 00 00 (00000000 00000000 00000000 00000000) (0)
8 4 (object header) 43 c1 00 f8 (01000011 11000001 00000000 11111000) (-134168253)
12 4 int Mao.a 0
16 1 boolean Mao.flag false
17 7 (loss due to the next object alignment)
Instance size: 24 bytes
Space losses: 0 bytes internal + 7 bytes external = 7 bytes total

可以看到jvm为了保证对象大小是8的倍数,使用了7个字节来填充。

Unsafe 魔法类

R大的官方解释:Unsafe是用于在实质上扩展Java语言表达能力、便于在更高层(Java层)代码里实现原本要在更低层(C层)实现的核心库功能用的。这些功能包括裸内存的申请/释放/访问,低层硬件的atomic/volatile支持,创建未初始化对象等。它原本的设计就只应该被标准库使用。

Unsafe类不能被直接new出来使用,原因是其构造方法是私有的,Unsafe的初始化方法主要是通过getUnsafe方法的单例模式实现,在getUnsafe方法里限定了只有BootStrap classLoader 才能对其进行加载,否则抛出SecurityException

1
2
3
4
5
6
7
8
9
10
11
12
13
//构造方法
private Unsafe() {
}

private static final Unsafe theUnsafe;
public static Unsafe getUnsafe() {
Class var0 = Reflection.getCallerClass();
if (!VM.isSystemDomainLoader(var0.getClassLoader())) {
throw new SecurityException("Unsafe");
} else {
return theUnsafe;
}
}

使用Unsafe的方法,使用反射:

1
2
3
4
5
6
7
8
9
10
11
12
13
public class UnsafeInstance {

public static Unsafe reflectGetUnsafe() {
try {
Field field = Unsafe.class.getDeclaredField("theUnsafe");
field.setAccessible(true);
return (Unsafe) field.get(null);
} catch (Exception e) {
e.printStackTrace();
}
return null;
}
}

Unsafe是java并发包的基石。

Diamond架构解析

Diamond主要提供持久配置的发布和订阅服务,最大特点是结构简单,稳定可靠。主要的使用场景:TDDL使用Diamond动态切换数据库,动态扩容等;业务使用Diamond推送系统开关配置。Diamond产品专注于高可用性,基于此在架构、容灾机制、数据获取模型上有一些与同类产品的不同之处——阿里巴巴Diamond介绍

diamond架构图

无标题2.png

配置信息存放在哪里

无标题3.png

gourp_info表存组的信息,组的概念是用来区分不同环境的(奇怪的是,阿里开源出来的Diamond并未使用到这个表~~)
config_info表用来存放具体的配置信息

数据保存逻辑

diamond3.png

对应的AdminController的postConfig方法,保存顺序:数据库->更新md5cache->本地磁盘->通知其他节点更新;

md5cache是用ConcurrentHashMap存储的,key是group/dataId,
value是content的md5字符串,MD5类是单例的,对数据进行md5的算法加了锁。客户端来请求配置信息(带着group和dataId),服务端会查看内存中的md5cache是否有对应的配置信息(内存中取值,速度快)

通知其他节点更新的方式:首先获取node.properties保存的地址,然后通过http方式发送请求。
其它节点从数据库获取最新配置信息然后保存到本机磁盘上

客户端和服务端如何交互

diamond4.png
diamond5.png

  • 利用工厂类DiamondClientFactory创建单例订阅者类。
  • 将客户端创建的侦听器类添加到侦听器管理list中并注入到新创建的订阅者类中。
  • 为订阅者设置dataId和groupId。
  • 启动订阅者线程,开始轮询消息。

配置变更客户端如何感知

diamond6.png

  • 方法内部启动一个定时线程,客户端第一次启动60秒后执行一次获取最新配置信息,后续默认每隔15秒执行一次
  • 方法内部实际上三个主方法分别是:

    checkLocalConfigInfo:主要是检查本地数据是否有更新,如果没有则返回,有则返回最新数据,并通知客户端配置的listener。

    checkDiamondServerConfigInfo:远程调用服务端,获取最新修改的配置数据并通知客户端listener。

    checkSnapshot:主要是持久化数据信息用的方法。

Diamond缺陷及改进思路

  • 界面过于简单、不够美观
  • 权限控制不够精细
  • 没有灰度发布功能
  • 配置信息变更无法及时生效

h2-insert语句流程分析

1
INSERT INTO TEST(ID, NAME) VALUES(3000, 'aaa');

解析得到Insert命令

1
2
3
4
5
6
7
8
9
10
org.h2.jdbc.JdbcStatement#execute(java.lang.String)
->org.h2.jdbc.JdbcStatement#executeInternal
->org.h2.jdbc.JdbcConnection#prepareCommand(java.lang.String, int)
->org.h2.engine.Session#prepareCommand
->org.h2.engine.Session#prepareLocal
->org.h2.command.Parser#prepareCommand
->org.h2.command.Parser#parse(java.lang.String)
->org.h2.command.Parser#parse(java.lang.String, boolean)
->org.h2.command.Parser#parsePrepared
->org.h2.command.Parser#parseInsert

关键步骤是进入 org.h2.command.Parser#parseInsert 新建了一个Insert命令

  • 校验insert的表是否存在

    1
    2
    3
    4
    5
    6
    7
    8
    9
    10
    11
    12
    13
    14
    15
    16
    17
    18
    19
    20
    21
    22
    23
    24
    25
    26
    27
    28
    29
    30
    31
    private Table readTableOrView(String tableName) {
    if (schemaName != null) {
    Table table = getSchema().resolveTableOrView(session, tableName);
    if (table != null) {
    return table;
    }
    } else {
    //首先查看 PUBLIC Schema里的tablesAndViews 是否存在key为tableName
    Table table = database.getSchema(session.getCurrentSchemaName())
    .resolveTableOrView(session, tableName);
    if (table != null) {
    return table;
    }
    //遍历该session对应Schema 中tablesAndViews 是否存在key为tableName
    String[] schemaNames = session.getSchemaSearchPath();
    if (schemaNames != null) {
    for (String name : schemaNames) {
    Schema s = database.getSchema(name);
    table = s.resolveTableOrView(session, tableName);
    if (table != null) {
    return table;
    }
    }
    }
    }
    if (isDualTable(tableName)) {
    return new DualTable(database);
    }
    //不存在则抛异常 不能insert一个数据库不存在的表吧^_^
    throw DbException.get(ErrorCode.TABLE_OR_VIEW_NOT_FOUND_1, tableName);
    }

h2-create语句流程分析

1
stat.execute("create table test(id int primary key, name varchar(255))");

总流程

1
2
3
4
5
6
7
8
9
10
11
12
13
14
15
16
17
18
19
20
21
22
23
24
25
26
27
28
29
30
31
32
33
//解析生成Command
CommandInterface command = conn.prepareCommand(sql, fetchSize);
boolean lazy = false;
boolean returnsResultSet;
synchronized (session) {
setExecutingStatement(command);
try {
if (command.isQuery()) {
returnsResultSet = true;
boolean scrollable = resultSetType != ResultSet.TYPE_FORWARD_ONLY;
boolean updatable = resultSetConcurrency == ResultSet.CONCUR_UPDATABLE;
ResultInterface result = command.executeQuery(maxRows, scrollable);
lazy = result.isLazy();
resultSet = new JdbcResultSet(conn, this, command, result, id,
closedByResultSet, scrollable, updatable);
} else {
returnsResultSet = false;
//执行Command命令
ResultWithGeneratedKeys result = command.executeUpdate(
conn.scopeGeneratedKeys() ? null : generatedKeysRequest);
updateCount = result.getUpdateCount();
ResultInterface gk = result.getGeneratedKeys();
if (gk != null) {
generatedKeys = new JdbcResultSet(conn, this, command, gk, id,
false, true, false);
}
}
} finally {
if (!lazy) {
setExecutingStatement(null);
}
}
}

主要就是两步:

  • 解析sql语句生成Command
  • 执行Command命令

解析sql语句生成Command

1
2
3
4
5
6
org.h2.command.Parser#prepareCommand
->org.h2.command.Parser#parse(java.lang.String)
->org.h2.command.Parser#parsePrepared(这一步解析出是create语句)
->org.h2.command.Parser#parseCreate
->org.h2.command.Parser#parseCreateTable
->org.h2.command.Parser#parseTableColumnDefinition
  • org.h2.command.Parser#parseCreateTable这一步会新建一个CreateTable对象
1
2
3
4
5
6
7
8
9
//获取schema 构建创建sql语句
Schema schema = getSchema();
CreateTable command = new CreateTable(session, schema);
command.setPersistIndexes(persistIndexes);
command.setTemporary(temp);
command.setGlobalTemporary(globalTemp);
command.setIfNotExists(ifNotExists);
command.setTableName(tableName);
command.setComment(readCommentIf());

这个Schema就是创建DataBase对象时生成的PUBLIC Schema

  • org.h2.command.Parser#parseTableColumnDefinition这一步会解析出列-Column对象
1
2
3
4
5
6
7
8
9
10
11
12
13
Column column = parseColumnForTable(columnName, true, true);
if (column.isAutoIncrement() && column.isPrimaryKey()) {
column.setPrimaryKey(false);
IndexColumn[] cols = { new IndexColumn() };
cols[0].columnName = column.getName();
AlterTableAddConstraint pk = new AlterTableAddConstraint(
session, schema, false);
pk.setType(CommandInterface.ALTER_TABLE_ADD_CONSTRAINT_PRIMARY_KEY);
pk.setTableName(tableName);
pk.setIndexColumns(cols);
command.addConstraintCommand(pk);
}
command.addColumn(column);

这里最重要的是往 CreateTable 的columns 变量添加column。最终会返回一个CreateTable的Command

执行update命令

1
2
3
org.h2.command.Command#executeUpdate
->org.h2.command.CommandContainer#update
->org.h2.command.ddl.CreateTable#update
  • org.h2.command.CommandContainer#update这步会新建一个表对象-Table
1
2
3
4
5
6
7
8
9
10
11
12
13
14
15
16
17
18
19
20
21
changePrimaryKeysToNotNull(data.columns);
data.id = getObjectId();
data.create = create;
data.session = session;
//根据schema创建table
Table table = getSchema().createTable(data);

ArrayList<Sequence> sequences = generateSequences(data.columns, data.temporary);
table.setComment(comment);
if (isSessionTemporary) {
if (onCommitDrop) {
table.setOnCommitDrop(true);
}
if (onCommitTruncate) {
table.setOnCommitTruncate(true);
}
session.addLocalTempTable(table);
} else {
db.lockMeta(session);
db.addSchemaObject(session, table);
}

其中db.addSchemaObject(session, table); 会往PUBLIC这个Schema的变量tablesAndViews(类型为ConcurrentHashMap)出入变量:

  • key: TEST
  • value: 对应的建表语句生成的Table对象

表对象有了,接下来的insert语句会去PUBLIC这个Schema根据key找对应表对象